Search This Blog

Saturday, August 29

30-day evaluation tool : DU Meter ( Watching your data transfer rates can be very enlightening no matter what you do online)

 DU Meter : 
Download:

Why should you use DU Meter?

  • Have you ever found yourself wondering why some downloads seem to take an eternity to complete, or why your e-mail program seems to be stuck in the middle of e-mail retrieval. Is it really hanging, or maybe it's just downloading a large e-mail attachment? DU Meter provides the answer to these and other mysteries, and can also alert you of dangerous or unexpected network activity. Watching your data transfer rates can be very enlightening no matter what you do online, and you'll soon be wondering how you managed without DU Meter before.
     
  • Many Internet users believe their "unlimited" account lets them surf the Internet, send large email attachments and download as many movies and songs as they choose. However it is well documented by the media that many Internet Service Providers, both in the U.S. and elsewhere, do in fact set definite usage limits, even though they may advertise to the contrary. Some will take drastic measures like termination of an account without any advance warning, if these limits are exceeded. DU Meter can create detailed reports of the total network traffic volume on your computer and can alert you if certain limits are surpassed. If you have teenage children or if you own or manage a business, DU Meter can be especially useful for you to you too.

DU Meter for parents and business owners

If you have teenage children or if you own or manage a small business, you already know how hard it is to enforce certain rules for network usage, while respecting child's or employee's privacy.
If you install DU Meter on your child's or employee's computer, you can configure it to report back to you via email when monthly or weekly network traffic exceeds a certain threshold. DU Meter will let you know if someone is breaking your rules (For example using peer-to-peer software to share films and music).
Remember, you are legally responsible for what your kids are doing online. And while sharing music or videos may seem benign to them, copyright holding companies are suing peer-to-peer network users for thousands of dollars for copyright violations. DU Meter can alert you in time, so this kind of activity can be prevented.


DU Meter is a award-winning utility. It will enable you to use your Internet connection more efficiently by providing an accurate visualization of the data which is flowing through your computer's network connection. DU Meter also includes an extensive reporting facility, a flexible notifications and events system
Keep an eye on your Internet connection: see data coming in or going out.
Protect yourself from unexpected charges or Internet service disruption.
Receive alerts about dangerous or unexpected network activity.
Easy to use - works automatically with no user input required.
Uses very little resources, fully compatible with Windows Vista and XP, Windows 7
DU Meter window
DU Meter shows fast and steady
download on a fast network.
DU Meter window
Sporadic network activity,
slow modem Internet connection

Thursday, August 27

Improve torrent download speed with Best Torrent Search Engines + Google Trick for Torrent Search!

Torrent clients Speed up tools:

1.ABC : [Another Bittorrent Client] is an improved client for the Bittorrent peer-to-peer file distribution solution. ABC is based on BitTornado which extended from from Original Bittorrent Core System , coded by Bram Cohen.

2.Azureus Ultra Accelerator : is a program made to increase Azureus download speed. This useful and specialized add-on applies hottest technologies that can multiply the speed of any torrent download. Azureus Ultra Accelerator will boost download speed of large files, such as full albums, movies, TV shows, games, and applications. And, it automatically finds more source faster than Azureus original application; it is optimized and easy to use.

3.BitComet Ultra Accelerator is a useful plug-in for BitComet file sharing application. The program incorporates the most up-to-date technology to speed up BitComet downloads. Also, the quantity of download sources will be improved - you can have more seeds accessible than normally discovered by your BitComet. Interface is attractive and user-friendly. Application is FREE. A fabulous utility for all BitComet users!

4.BitTorrent SpeedUp PRO is an innovative plug-in for BitTorrent. The architecture of the program is designed to permit you downloads of MP3s, movies and other desired files at highest speed. Bandwidth of your Internet connection is designed as efficiently as possible and BitTorrent Acceleration Patch will allow to you find more sources to download.

5.eMule Turbo Accelerator is a helpful add-on for the users who use eMule file sharing program.

Latest technology implemented will enable you to download MP3s, movies and other desired files faster than ever.

eMule Turbo Accelerator will ensure that your bandwidth is used to its highest capability. Also the booster will help you find more sources to download.


There are many sites which host torrent on Internet but most of them are spam sites or porn sites. So finding a torrent is hard and Google is not just enough to do this job. So here comes the list of search engines specially meant for searching torrents! At the end I will be sharing a trick to use Google for searching torrents!

torrentz Torrentz: This is my favorite. Simple and fast. Key feature is same torrent from different sources is not duplicated while showing results. So you get comprehensive search results. After selecting a torrent from results you can see user comments, various trackers, mirror links, related torrents & most important authenticity of that torrent.

It also have a dedicated movies & TV shows section. All torrent in these sections are verified. Additionally you can limit your searches to these sections. There is RSS feed option for these sections sections as well as for all search queries. So feed addicts will find torrentz most interesting!

ScrapeTorent ScrapeTorent: This also search across various torrent indexes. Key features are option to limit searches to particular category, option to filter dead-torrents & duplicates from results. They also have a forum if you need help. I come to know about this recently via Anil, a geek & fellow blogger.

pizzatorrent PizzaTorrent: I use this when torrentz fails. It shows real-time results from 15 best torrent hosts. It doesn’t club similar torrents in a single group so you may notice much higher number of results. But it does grouping by categories which saves you from downloading wrong torrent! However it produces too many useless results for multiword queries.

YouTorrentYouTorrent: It also shows real-time torrent results. By default it gathers results from 10 different torrent hosts. You can add/remove various torrent hosts for fine grained results. in left sidebar it shows related searches as well as top searches. This also produces few extra result which user may find useless. I think by default it looks search keywords in torrent description. This may be useful sometime but most of the time user is interested in torrent names only to get accurate search results.

PinkTorrentPinkTorrent: NOTE: This is for adults only. So skip this if you are minor according to laws in your county.

This is best for searching free porn torrents. I do not have more details about this but its best according to many reliable sources. Use at your own risk! Only thing about safety I can say never share your personal information with porn sites specially your credit card info!

GoogleGoogle: Yep Google can be used smartly to search anything on the Web! Just add filetype:torrent as it is to your search query and you will get results restricted to torrents. I use this only when all above fails. Unfortunately due to high amount of spam in torrent world you will be disappointed most of the times!

Also check 6 Most Frequently Used Google Search Operators For Better Searching!

There are many torrent search engines on net so it may happen I am missing your favorite one. Anyway let us know which one you like?

Update: Following is list of torrent search engine picked up from comments below…

BTJunkie Logo BTJunkie – They have database of 1.5 million torrents which they claimed to be largest. Better search options and ability to browse torrent is plus point. [Added by Juan's comment]

Toorgle Logo Toorgle – Power of Google Search used across 250+ torrent websites. Have index of more than 7 million torrents. A nice example of Googles custom search! :-) [Added by Chris's comment]

Torrent Finder Logo Torrent-Finder – Option wise this beats all other torrent search site. Really huge database, with fine-grain control over what you want to include in search! Results can be browse in tabs


http://www.desitorrents.com for hindi torrents.
http://www.rlslog.net for Best movie collection.
http://isohunt.com for best iso images
http://www.multitorrent.org a very nice meta search engine.
http://mininova.org got great collection of good seeded torrents.
http://btjunkie.org got great collection of good seeded torrents.
http://torrent-finder.com/ huge meta-search torrent look up site.
http://filesharefreak.com/ again good collection of good seeded torrents.
http://btdig.com with some additional features.
http://torrentle.altervista.org/ Clear, fast and efficient
http://flixi.org is clean and easy to use.
http://torrentmoon.com huge meta-search torrent look up site.
http://www.completorrent.com huge meta-search torrent look up site.
http://www.witorrent.com just one word "incredible"
http://TorrentZEN.com/ good one :)
http://www.cubetorrent.com again good collection of good seeded torrents.
http://www.torrentsrsq.com great search and lots of links, being updated every hour.
http://www.go-torrent.com with a tracker list that you can import in your utorrent.


looking forward your suggestion and comment about this collection (click here)!!!!

Wednesday, August 26

Cleaning and Tweaking

Advanced SystemCare :
Download :
(formerly Advanced WindowsCare) is a comprehensive PC care utility that takes a one-click approach to help protect, repair and optimize your computer. It provides an all-in-one and super convenient solution for PC maintenance and protection. This program is available free of charge.
  • Scan and remove spyware and adware with the latest definition
  • Prevent spyware, hijackers and bad websites from being installed
  • Erase the history of all activities in your computer
  • Scan and fix invalid and improper registry entries
  • Detect and remove invalid startup items
  • Search and Clean up unused Windows garbage
  • Repair system configurations, Eliminate System Bottlenecks and Prevent Crashes
  • Tune up Windows to improve both system and Internet performance, unleash the power of your Windows
  • Analyze and Show detailed information of hardware and Windows
  • Finish all Work with one click, Super Easy to Use.

CCleaner :
Download:

(formerly Crap Cleaner) is a freeware system optimization and privacy tool. It removes unused and temporary files from your system - allowing Windows to run faster, more efficiently and giving you more hard disk space. The best part is that it's fast! (normally taking less than a second to run) and Free.

Cleans the following:
  • Internet Explorer Cache, History, Cookies, Index.dat.
  • Recycle Bin, Temporary files and Log files.
  • Recently opened URLs and files.
  • Third-party application temp files and recent file lists (MRUs).
    Including: Firefox, Opera, Media Player, eMule, Kazaa, Google Toolbar, Netscape, Office XP, Nero, Adobe Acrobat, WinRAR, WinAce, WinZip and more...
  • Advanced Registry scanner and cleaner to remove unused and old entries.
    Including File Extensions, ActiveX Controls, ClassIDs, ProgIDs, Uninstallers, Shared DLLs, Fonts, Help Files, Application Paths, Icons, Invalid Shortcuts and more... Backup for registry clean.
  • Windows Startup tool.
Comodo System Cleaner :
Download :

A powerful suite of utilities and tools that allows you to make your Windows XP or Vista computer faster, more efficient and more secure.
  • Take control by customizing virtually every aspect of Windows XP or Vista with just a few mouse clicks.
  • Optimize system performance, disk space and overall stability with built in Registry Cleaner and Disk Cleaner tools
  • Gain complete visibility and control over your computer's hardware, software, processes and performance with powerful diagnostics tools
  • Ensure complete on-line and off-line privacy by clearing the history, cache and temp files of Internet browsers, instant messengers and Windows applications
  • Protect your privacy and data with essential security utilities like Permanent File Wiper and built-in hash value checker and more...
TweakMASTER :
Download:

Actually a suite of four applications designed to speed up and optimize internet connections.

It represents the culmination of five years experience by one of the foremost innovators in the field of Internet Optimization.

No matter what is your Internet connection or what other utilities you may have tried, nothing will provide a faster Internet connection for you than TweakMASTER, guaranteed! TweakMASTER works for all types of connections from dialup to DSL, Cable, and Wireless. Even AOL users will be amazed at how much more responsive their system will be!

Unlike so many of the outdated utilities out there today which depend on deceptive advertising while claiming to speed up your connection, TweakMASTER can actually do just that.

It will correctly optimize all versions of Windows. Full Support for AOL 5, 6 and 7 is also included.

Wise Disk Cleaner :
Download;


A free, user friendly, fast and easy to use application developed to free up disk space by deleting junk files that are no longer used by any software on your system.

Even the least experienced user can easily remove junk files with this tool.
Wise Disk Cleaner scans junk files and delete these junk files in windows system, your system will can work better and more quickly.

Wise Disk Cleaner can scan more than 50 types of junk files, and you can freely add the type of junk file which you consider.

After Wise Disk Cleaner analyzes your system for find junk files, you can individually view each of the junk file found and call up a detailed description. If you wish, you can also clean up all junk files automatically.

Yet Another (remote) Process Monitor :
http://yaprocmon.sourceforge.net/index.html


(YAPM) is a powerful application that allows to view and manage your running tasks, processes, threads, modules, windows, handles, network connections and your services on a local or on a remote machine. YAPM offers lots of features to manipulate them, such as privilege management, memory management, a complete history of statistics, a dependency viewer... etc.

The main purpose of YAPM is to display all informations availables about processes/services of a local/remote system and all related objects (threads, modules...), and to update all these informations in real time.

Features:
  • Module and thread management
  • Handle management (keys, files)
  • View of TCP/UDP connections opened by the processes
  • Window management (opacity, position, show, hide)
  • Emergency Hotkeys feature: allows to associate a custom shortcut to a custom action (for example: Ctrl+Shift[l+Suppr to close the window which is on foreground)
  • Privilege management: allows to view and modify the privileges of processes
  • Build-in hex editor to view memory of processes
  • 'Log mode' to monitor all actions made by a specific process
  • Hidden Processes feature to detect basic rootkits
  • Local and remote shutdown
  • Dependency viewer.

I am sure these tools will help you to make your system better. waiting for your feedback & comments !!!( For your comment click here)

Tutorial : Did you ever asked WHAT IS INTERNET ?


What is internet Backbone

The Internet backbone refers to the main "trunk" connections of the Internet. It is made up of a large collection of interconnected commercial, government, academic and other high-capacity data routes and core routers that carry data across the countries, continents and oceans of the world.

The resilience of the Internet is due to its core architectural feature of storing as little as possible network state in the network elements and rather relying on the endpoints of communication to handle most of the processing to ensure data integrity, reliability, and authentication. In addition, the great degree of redundancy of today's network links and sophisticated real-time routing protocols provide alternate paths of communications for load balancing and congestion avoidance.

The Internet "backbone" consists of many different networks. Usually, the term is used to describe large networks that interconnect with each other and may have individual ISPs as clients. For example, a local ISP may provide service to individual homes or business using bandwidth that it purchases from another company with a backbone network. Backbone networks are usually commercial, educational, or government owned, such as military networks.

Internet Backbone

The National Science Foundation (NSF) created the first high-speed backbone in 1987. Called NSFNET, it was a T1 line that connected 170 smaller networks together and operated at 1.544 Mbps (million bits per second). IBM, MCI and Merit worked with NSF to create the backbone and developed a T3 (45 Mbps) backbone the following year.

Backbones are typically fiber optic trunk lines. The trunk line has multiple fiber optic cables combined together to increase the capacity. Fiber optic cables are designated OC for optical carrier, such as OC-3, OC-12 or OC-48. An OC-3 line is capable of transmitting 155 Mbps while an OC-48 can transmit 2,488 Mbps (2.488 Gbps). Compare that to a typical 56K modem transmitting 56,000 bps and you see just how fast a modern backbone is.

Today there are many companies that operate their own high-capacity backbones, and all of them interconnect at various NAPs around the world. In this way, everyone on the Internet, no matter where they are and what company they use, is able to talk to everyone else on the planet. The entire Internet is a gigantic, sprawling agreement between companies to intercommunicate freely.

In 2009, the 10 billionth Internet user logged on to the World Wide Web. Hundreds of thousands of new users log in for the first time each week. It is estimated that the 20 billion user mark will be reached in less than 5 years from now. There is no question that the World Wide Web is growing and becoming more important each day.

More than ever, individuals and companies rely on the stability of the Internet for a constant exchange and display of important information. Virtually every financial institution in the world stores information on and uses the Internet to shift commodities and allow customers access to their funds. Millions of businesses rely on the web as their lifeblood and direct connection to their customer base. Critical information is exchanged between institutions of higher learning, hospitals, and research facilities. It is indisputable that the importance of a redundant, reliable Internet is crucial in modern times.

The Internet backbone is a conglomeration of multiple networks, routing facilities, and servers that provide a multiple redundancy approach to keeping information online available and secure. Simply put, it enables back up networks to take on the load of a failed network or multiple failed networks.

Each ISP (Internet Service Provider) is equipped with its own contingency backbone network or is at least equipped with an outsourced backup. These smaller networks are interlinked and intertwined to provide the multi-faceted backup redundancy needed to keep the web intact in case of partial failure through peering and transit agreements.

Peering is the term assigned to the sharing of Internet traffic and users voluntarily by multiple networks, typically privately owned by companies. Peering typically refers to these networks being shared with no monetary gain being obtained by their owners. Rather, an agreement is made between multiple parties to handle each other's traffic in times of need, with each network gaining its revenue from its own customer base. A transit agreement is a particular type of peering arrangement between ISPs that may contain a monetary agreement. Generally larger ISPs will create multiple transit agreements with smaller ISPs that are in need of additional facilities than they possess.

With each passing year, the importance of the World Wide Web and its contents increases exponentially. As more users log on each day, the need for a worldwide redundant communication and storage network becomes more imperative to effective and reliable commerce and stability. The backbone of the Internet will continue to evolve and progress in relon to increased needs of the world economy and inter connectivity of its users.

Major Internet ISP (Major Internet Backbone MAPs)

This page links to the major pieces of the Internet's infrastructure.
This page is used during my customized, onsite courses such as : "What Every Internet Employee Should Know about the Internet"


I am looking forward your comments about this tutorial !!!!( For your comment click here)

Friday, August 21

Tutorial : port forwarding & software

What is Port Forwarding?

There are a couple of concepts you need to know before you can understand port forwarding. I'm going to make a couple broad statements that are almost always true. For simplicity lets assume they are true for now.
1.) Every device on the internet has at least one ip address. The IP address is a number that is used to identify a device. For more information on ip addresses refer to our What is an IP Address page.
2.) Every IP address is divided up into many ports. When one computer sends data to another computer, it sends it from a port on an ip address to a port on an ip address. For more information on ports refer to our What is a Port page.
3.) A port can only be used by one program at a time.
Now that we've got those general concepts out of the way let's talk about NAT. NAT is an acronym for Network Address Translation. NAT takes one ip address and basically breaks it into many ip addresses.
Here the external ip address is broken into two internal ip addresses. The first ip address "IP Address1" is the gateway. While "IP Address2" is the ip address of the first computer. Take note that the router has two ip addresses. It has the external ip address, and an internal ip address which acts as the gateway for every computer on the network.
Excuse my rough drawing. Computers on the internal network can only "see" internal ip addresses. So computers on the internal network can not send data directly to a computer outside of the network. When a computer on the network wants to send data to a computer outside of the network, it sends the data to the gateway. Remember the gateway is the internal ip address of the router. The router then takes this data and sends it out to the computer on the internet. The router sends the data out of the external ip address. The same thing is true of computers on the internet. A computer outside of the network can not "see" a computer inside of the network. They can only "see" and send data to the external ip address of the router. The router must then decide what to do with this data. Lucky for us NAT takes care of most of the work for us. There are some programs that NAT was not designed to work with, those are the programs we need to set up port forwarding for. Okay take a deep breath! We are on to port forwarding.
Now that you understand the general concepts of a network, explaining port forwarding is easy. When a computer on the internet sends data to the external ip address of the router, the router needs to know what to do with the data. Port Forwarding simply tells the router which computer on the local area network to send the data to. When you have port forwarding rules set up, your router takes the data off of the external ip address:port number and sends that data to an internal ip address:port number. Port Forwarding rules are created per port. So a rule set up for port 53 will only work for port 53.
A port can only be used by one program at a time! Think of how this rule interacts with NAT. Well you've only got one external ip address on your router. When computer 1 is using port 500, it is using port 500 on it's internal ip address. If you have set up a port forwarding rule for computer 1 and port 500, the external ip address's port 500 is also in use. This means that you can only use port 500 on one computer on the network at a time. Using port 500 on two computers at the same time would violate the one program rule, and your data would get messed up. Most routers require you to specify an internal ip address to forward ports to, just for this reason. Some do not, so be aware of this. Port Forwarding rules will only work for one computer at a time!


Simple Port Forwarding :

SPF includes a tool to set your IP to static or back to DHCP. When port forwarding the router forwards to an IP address. When DHCP is enabled your IP address can change and thus breaking the port forwarding. By setting your IP to static it never changes. I added this tool to make setting a static IP as easy as possible for people instead of manually doing it on there systems (Which if a person has never done it before can be a little intimidating). The Program also makes adding the ports to the windows firewall as easy as a few clicks! Once you have your ports forwarded you can then test to see if they can be accessed right from with in the program using the built in port tester.

Version
:
2.5.0
Title
:
Simple Port Forwarding 2.5.0
Filename
:
simple_port_forwarding_v2.5.0_setup.exe
File size
:
4.00MB
Requirements
:Windows 2000/2003/2008/Vista/XP/Windows 7
License
:Freeware
Date added
:August 1, 2009

I am looking forward your comments about this tutorial !!!!( For your comment click here)

Wednesday, August 19

Free PDF Maker : Software Download


http://www.dopdf.com/download.php
I found these free PDF creator, doPDF, at http://www.dopdf.com/ use them to create PDF files from any application that supports printing. they are very easy to use, click Print from an application (like MS Word for example), choose doPDF instead of your regular printer and the PDF file will be created. You’ll love them.

-------------------------------------------------------------------------------------------------


http://www.cutepdf.com/
CutePDF Writer (Freeware)
Create professional quality PDF files from almost any printable document. FREE for personal, commercial, gov or edu use! No watermarks! No popup Web ads! Now supports 64-bit Windows. Free Download (1.6MB) (Vista Ready)

-----------------------------------------------------------------------------------------------
All downloads are free. Once on your computer, just click to install and you're ready to start creating professional-quality PDF files from any application the fast affordable way. Pdf995 is compatible with Adobe Acrobat v9.0, Adobe Reader v9.0 and previous versions.
Pdf995 2-Step Download
Pdf995 Printer DriverVersion 9.2
Download 2.5 MB
Free Converter • Version 1.3
Download 9.1 MB
Consists of both the printer driver and a free Converter.
PdfEdit995Version 9.3
Download
with advanced support for combining and extracting PDF pages
Signature995 • Version 9.0
Download
with support for restricted printing, modifying, copying text and images
The free versions of pdf995 products will display a sponsor page in your web browser each time you run the software. If you would prefer not to see sponsor pages,
-------------------------------------------------------------------------------------------------


PrimoPDF is the web's #1 free software for creating 100% industry-standard PDF files. Simple to use and free of annoying ads, converting files to PDF has never been easier!
Nitro PDF Professional adds one-click PDF conversion for common office documents like Microsoft Word, Excel, PowerPoint, Visio, Publisher, and offers a full suite of PDF editing capabilities

http://www.primopdf.com/

------------------------------------------------------------------------------------------------- PDFCreator


PDFCreator is a free tool to create PDF files from nearly any Windows application.
Key Features:
Create PDFs from any program that is able to print
Security: Encrypt PDFs and protect them from being opened, printed etc.
Send generated files via eMail
Create more than just PDFs: PNG, JPG, TIFF, BMP, PCX, PS, EPS
AutoSave files to folders and filenames based on Tags like Username, Computername, Date, Time etc.
Merge multiple files into one PDF
Easy Install: Just say what you want and everything is installed
Terminal Server: PDFCreator also runs on Terminal Servers without problems
And the best: PDFCreator is free, even for commercial use! It is Open Source and released under the Terms of the GNU General Public License.
Download PDFCreator now!
Download
There are some different packages of a PDFCreator version.note: you will be directed to the sourceforge.net download page, where you can select a download mirror
Download PDFCreator 0.9.8 This version should be the right one for the majority of people. If you don't know the difference to the other packages, use this one
Download PDFCreator 0.9.8 Source Code As PDFCreator is Open Source, there is also a source releaseYou always find the most recent source, maybe with additions and fixed since the last release, in the subversion repository.
------------------------------------------------------------------------------------------------

I am looking forward your comments about this tutorial !!!!( For your comment click here)

Sunday, August 16

E-Mail hacking consists of various techniques as discussed below.


1) EMail Tracing :- Generally, the path taken by an email while travelling from sender to receiver can be explained by following diagram.
The most effective and easiest way to trace an email is to analyze it's email headers. This can be done by just viewing the full header of received email. A typical email header looks something like this:


From Barr Thu Aug 13 05:33:26 2009 X-Apparently-To: prasherekar@yahoo.co.in via 203.104.16.34; Thu, 03 Jan 2008 05:25:38 +0530 X-YahooFilteredBulk: 189.160.34.89 X-Originating-IP: [189.160.34.89] Return-Path: Authentication-Results: mta113.mail.in.yahoo.com from=destatis.de; domainkeys=neutral (no sig) Received: from 189.160.34.89 (HELO dsl-189-160-34-89.prod-infinitum.com.mx) (189.160.34.89) by mta113.mail.in.yahoo.com with SMTP; Thu, 03 Jan 2008 05:25:38 +0530 Received: from dvapa ([141.203.33.92]) by dsl-189-160-34-89.prod-infinitum.com.mx with Microsoft SMTPSVC(6.0.3790.0); Wed, 2 Jan 2008 18:03:26 -0600 Message-ID: <477c264e.3000604@destatis.de> Date: Wed, 2 Jan 2008 18:03:26 -0600 From: "Barr" Add to Address Book User-Agent: Thunderbird 2.0.0.6 (Windows/20070728) MIME-Version: 1.0 To: prasannasherekar@yahoo.co.in Subject: angel rubberneck Content-Type: multipart/related; boundary="------------030604060204000701040304" Content-Length: 16433 The above email header gives us the following information about it's origin and path:a) Sender's email address :- atiles@destatis.deb) Source IP address :- 141.203.33.92c) Source mail server :- dsl-189-160-34-89.prod-infinitum.com.mxd) Email client :- Thunderbird 2.0.0.6


There are lots of ready-made tools available on the internet which performs email tracing very effectively and shows exact geographical location for email sender on the world map.


Recommended Tools
NeoTrace
http://www.neotrace.com
VisualRoute
http://visualroute.visualware.com
E-MailTracker
http://www.visualware.com

I am looking forward your comments about this tutorial !!!!( For your comment click here)


Tutorial : Protect yourself for being hacked :)

Most passwords can be cracked by using following techniques :
1) Hashing :- Here we will refer to the one way function (which may be either an encryption function or cryptographic hash) employed as a hash and its output as a hashed password.If a system uses a reversible function to obscure stored passwords, exploiting that weakness can recover even 'well-chosen' passwords. One example is the LM hash that Microsoft Windows uses by default to store user passwords that are less than 15 characters in length. LM hash breaks the password into two 7-character fields which are then hashed separately, allowing each half to be attacked separately.
Hash functions like SHA-512, SHA-1, and MD5 are considered impossible to invert when used correctly.

2) Guessing :- Many passwords can be guessed either by humans or by sophisticated cracking programs armed with dictionaries (dictionary based) and the user's personal information.
Not surprisingly, many users choose weak passwords, usually one related to themselves in some way. Repeated research over some 40 years has demonstrated that around 40% of user-chosen passwords are readily guessable by programs. Examples of insecure choices include:
* blank (none)* the word "password", "passcode", "admin" and their derivatives* the user's name or login name* the name of their significant other or another person (loved one)* their birthplace or date of birth* a pet's name* a dictionary word in any language* automobile licence plate number* a row of letters from a standard keyboard layout (eg, the qwerty keyboard -- qwerty itself, asdf, or qwertyuiop)* a simple modification of one of the preceding, such as suffixing a digit or reversing the order of the letters.and so on....
In one survery of MySpace passwords which had been phished, 3.8 percent of passwords were a single word found in a dictionary, and another 12 percent were a word plus a final digit; two-thirds of the time that digit was.
A password containing both uppercase & lowercase characters, numbers and special characters too; is a strong password and can never be guessed.
Check Your Password Strength

3) Default Passwords :- A moderately high number of local and online applications have inbuilt default passwords that have been configured by programmers during development stages of software. There are lots of applications running on the internet on which default passwords are enabled. So, it is quite easy for an attacker to enter default password and gain access to sensitive information. A list containing default passwords of some of the most popular applications is available on the internet.
Always disable or change the applications' (both online and offline) default username-password pairs.
4) Brute Force :- If all other techniques failed, then attackers uses brute force password cracking technique. Here an automatic tool is used which tries all possible combinations of available keys on the keyboard. As soon as correct password is reached it displays on the screen.This techniques takes extremely long time to complete, but password will surely cracked.
Long is the password, large is the time taken to brute force it.

5) Phishing :- This is the most effective and easily executable password cracking technique which is generally used to crack the passwords of e-mail accounts, and all those accounts where secret information or sensitive personal information is stored by user such as social networking websites, matrimonial websites, etc.Phishing is a technique in which the attacker creates the fake login screen and send it to the victim, hoping that the victim gets fooled into entering the account username and password. As soon as victim click on "enter" or "login" login button this information reaches to the attacker using scripts or online form processors while the user(victim) is redirected to home page of e-mail service provider.
Never give reply to the messages which are demanding for your username-password, urging to be e-mail service provider.It is possible to try to obtain the passwords through other different methods, such as social engineering, wiretapping, keystroke logging, login spoofing, dumpster diving, phishing, shoulder surfing, timing attack, acoustic cryptanalysis, using a Trojan Horse or virus, identity management system attacks (such as abuse of Self-service password reset) and compromising host security.However, cracking usually designates a guessing attack.

I am looking forward your comments about this tutorial !!!!( For your comment click here)

Thursday, August 13

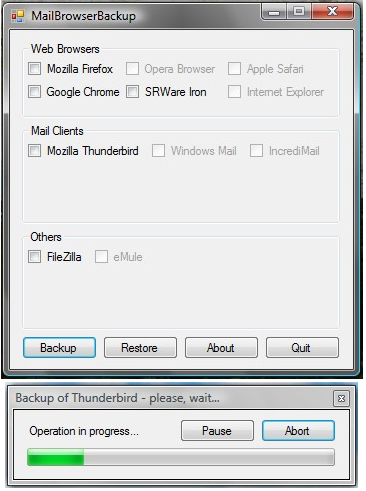
Tutorial :Backup Profiles & Settings Of Any Browser with MailBrowserBackup


Normally Geek users have multiple browsers like Internet Explorer, Firefox, Opera, Google Chrome installed on computer. Some users prefer to open particular websites in browser and rest in other browser for this they have multiple profiles created for each of these browsers.

Incase some thing goes wrong with your Windows or you need to reinstall your Windows OS for some unfortunate reason all your browser settings & profiles for each for these browser will be lost. As Solution to such issues you can take complete backup of browsers with backup tool like Mozbackup designed for Firefox.

Meaning you need to search and install backup utilities design for browsers you use. Here is one such good utility MailBrowserbackup which can backup settings of multiple browsers.

MailBrowserBackup Can take backup of follow Browsers and Applications

1. Internet Explorer

2. Mozilla Firefox

3. Opera Browser

4. Google Chrome

5. SRWare Iron

6. Apple Safari

7. Windows Mail

8. Mozilla Thunderbird

9. Filezilla

10. eMule

MailBrowserBackup

MailBrowserBackup is Open Source Project and requires .Net Framwork 2.0. Supports Widows XP and Vista. Linux Support coming. soon

Download MailBrowserBackup and backup Profiles & Settings of Any Browser.

I am looking forward your comments about this tutorial !!!!( For your comment click here)

Tutorial : Open Internet Explorer in Your Firefox Tab with IE Tab

Firefox Logo

Web Developers need to take extreme care of website look in different browser since a webpage may be displayed completely different in Firefox browser then Internet Explorer. Checking website in Internet Explorer of Firefox requires switching back front between Firefox and IE.

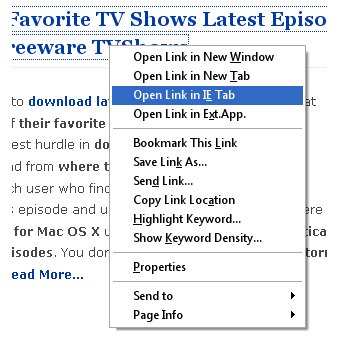
We have already told how to open Firefox Window inside Firefox tab now here is another trick to increase productivity. Firefox extension IE Tab which lets you to open or embedding Internet Explorer in tabs of Mozilla/Firefox. This is a great tool for web developers, since you can easily see how your webpage getting displayed in IE with just one click and then switch back to Firefox.

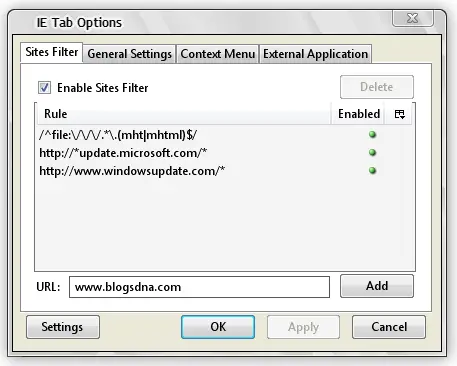
With IE Tab you can also set predefined filters for directly opening there Web Pages in IE of Firefox tab.

Screen shot of IE Tab Extension for Mozilla Firefox

Open IE in Firefox Tab

Firefox Extension IE Tab Filters Settings

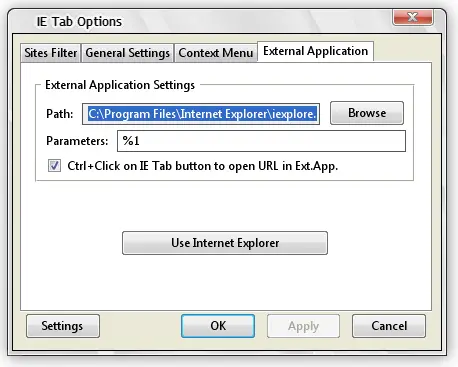
Firefox Extension IE Tab Open in External Application

Download IE Tab Firefox Extension (Works on Firefox 3.0 and Above).

Wednesday, August 12

VMware Tutorial: How to Install Windows 7 on Windows XP Using Vmware Player

How to Install Windows 7 on Windows XP Using Vmware Player

1. Install Vmware Player on your Windows XP

2. Type run->cmd and change directory to Qemu (folder where qemu is extracted)

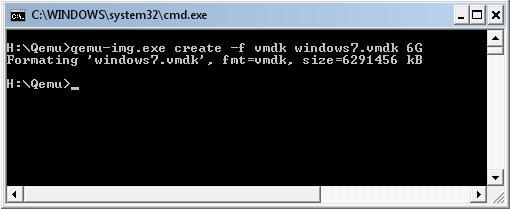
3. Now Type follow command to create Vmware compatible virtual disk of size 6 GB

qemu-img.exe create -f vmdk windows7.vmdk 6G

Create Windows 7 Virtual Disk using Qemu

I have created virtual disk of size 10GB & divided into 2GB files using Vmware-vdiskmanager comes with Vmware workstation, Reason of doing this is that Windows XP doesn’t support files larger then 2 GB because of addressing issue.

You want to create virtual disk of size 15GB then type at command prompt cmd->dir to VMware workstation directory. and type following command.

vmware-vdiskmanager.exe -c -s 15Gb -a ide -t 1 -q windows7.vmdk

Windows 7 Vmware Virtual Disk using vmware-vdiskmanager

4. To create .vmx file for Windows 7 use can use online vmx file builder (VMX file is Vmware virtual machine core configuration file and each virtual machine has its own .vmx file.)

Enter Following information while using VMX builder.

Display Name: Windows XP

Guest OS: Windows XP Professional Edition

Memory: 512 MB (Windows 7 Requires Minimum of 512 MB RAM)

Check: Sync Clock, VMTools Reminder, USB Host, Autoconnect

Ethernet: Check ETH0, Address Type: Generated, Address (leave default), Connection Type: Bridged (more info)

Check Sound Card, Type: Ensoniq ES1371, Check Absolute Mouse, NVRam Filename: nvram, IDE0:Master: Checked, File Name: WinXP.vmdk, Device Type: disk, Mode: Persistent, Check: WriteThrough, AutoDetect, Start Connected, IDE1:Master: Checked Device Type: cdrom-raw, Mode: Persistent Check: WriteThrough, AutoDetect, Start Connected

OR you can download pre-configured windows7.vmx file from here.

5. Once you have created .vmx file save it in your windows 7 folder (virtual machine folder where all your Windows 7 Virtual machine files will be stored)

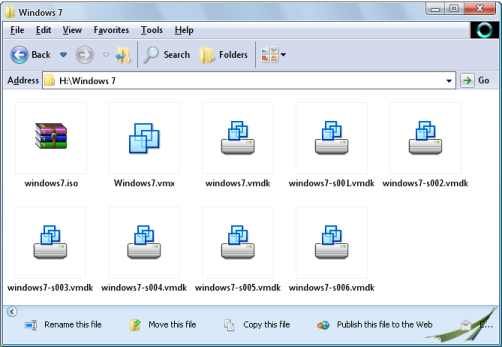
6. Now you should have Windows 7 folder with following files

a. widnows7.iso (windows 7 beta 1 iso file)

b. windows7.vmx file

c. windows7.vmdk files (empty virtual disk files)

Windows 7 Folder Content

Don’t forget to change

ide1:0.present = “TRUE”

ide1:0.fileName = “auto detect”

ide1:0.deviceType = “cdrom-raw”

ide1:0.autodetect = “TRUE”

ide1:0.startConnected = “FALSE”

To

ide1:0.present = “TRUE”

ide1:0.fileName = “windows7.iso”

ide1:0.deviceType = “cdrom-image”

ide1:0.autodetect = “TRUE”

ide1:0.startConnected = “FALSE”

In your windows7.vmx file if you have created by yourself. No need to do any thing if you have downloaded windows7.vmx from here. Above changes is done to use windows7.iso file as cdrom image file to let us install windows 7 on our virtual machine. Hence no need to burn windows7.iso file on DVD.

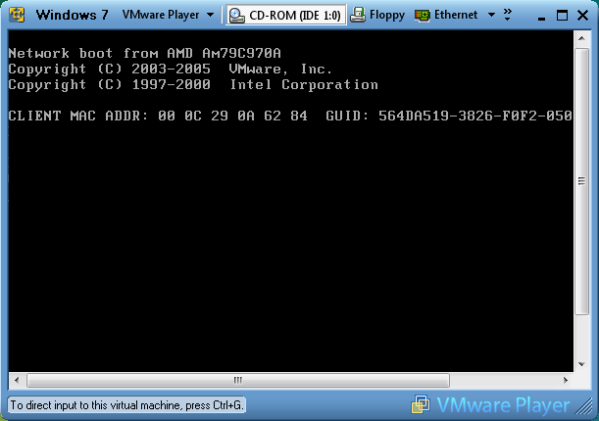
7. Now double click on windows7.vmx file and it will automatically open with Vmware player.

Starting Vmware Player

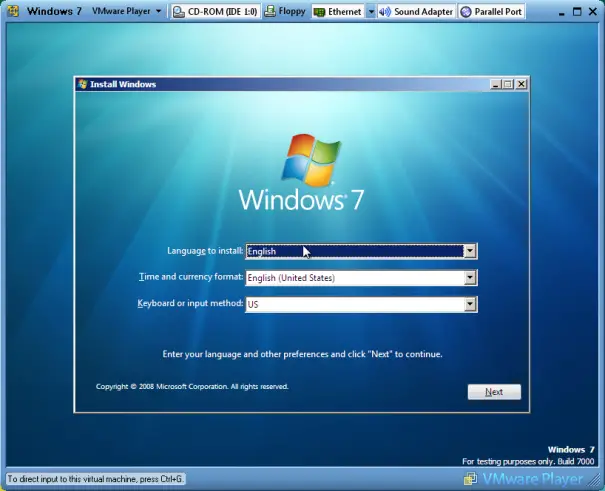
8. Vmware player will boot like normal machine and will detect windows7.iso file as soon as it finish booting. A prompt will be displayed to select option i.e to start windows 7 installation.

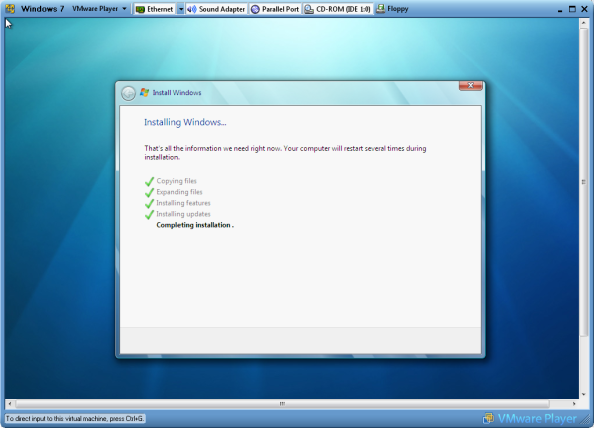
Windows 7 Installation on Vmplayer

9. Complete the Windows 7 instillation steps and wait for installation to finish.

Windows 7 Installation Completed

10. Once your Windows 7 boots for first time just make sure every thing is working fine by browsing Computer or Checking Program files.

11. Now its time to install Vmware tools. You need Extract Vmware tools from vmware workstation which contains windows.iso file. open this file with any iso opener like freeware CDimage. There are a few ways by which you can transfer the VMware Tools.msi file but I find the easiest is to just share it out from your host computer and connect via the network from your virtual machine. Once you have VMware Tools.msi on your virtual machine’s disk, double-click it and do a standard install.

12. To enable sharing between your Windows 7 and Windows XP copy following lines and add to your windows7.vmx file at the end (Assuming you need to share E: drive of your host operating system with windows 7)

sharedFolder0.enabled = “TRUE”

sharedFolder0.present = “TRUE”

sharedFolder0.writeAccess = “TRUE”

sharedFolder0.readAccess = “TRUE”

sharedFolder0.hostPath = “E:\”

sharedFolder0.guestName = “D”

sharedFolder0.eXpiration = “never”

sharedFolder.maxNum = “1″

Don’t forget to revert back the changes we had done in step number 6.

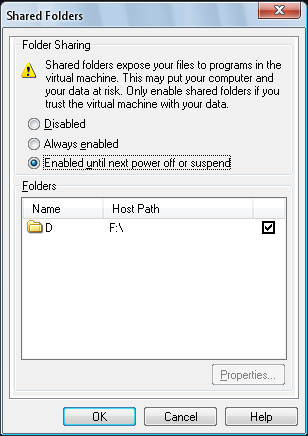
13. Now when you will start your Windows 7 you need to enable Vmware Player ->Share folders ->Check Always enable to enable sharing.

Enable Share Folders

14. Now after your Windows 7 boots, access your share folder by Mapping shared folder from Network and Install Vmware Tools.msi.

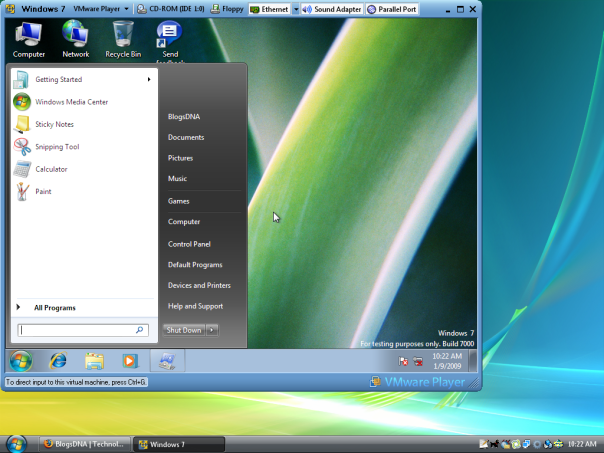
That’s it, Now Your Virtual Windows 7 Machine on Windows XP is ready for Use.

Windows 7 Beta 1 on Vmware Player

Please Note: I am running Windows XP SP 2 and using Windows Vista Transformation Pack so please do no confuse with screenshots, this is not Windows Vista.

Let me know if you have trouble in following any steps or any issue in installing Windows 7 on Vmware Player
Download:

I am looking forward your comments about this tutorial !!!!( For your comment click here)

Monday, August 10

Install Windows XP using USB Flash Disk/ Flash Drive - Step by Step Guide
SPONSORED LINKS


you want to install Windows XP, but your notebook (or PC) has no CDROM, you should install Windows XP using USB Flash disk/Flash Drive/Thumb drive...
just follow this guide :


step 1:
Buy an USB Flash Drive (at least 2GB).
When you do this tutorial, please make sure your computer/laptop/PC has a CD-ROM (or DVD).
so, now you have 2 computers, with CD-ROM

step 2:
Download this software pack (Komku-SP-usb.exe - Download) 1.47MB
UPDATE 1 :
Anonymous said…
your download at mediafire keeps timing out, any other hosts available?
Mirror Depositfiles
Mirror Rapidshare
Mirror Easy-Share
Mirror Megaupload


this software pack contains 3 application :

-BootSect.exe (Boot Sector Manipulation Tool)
-PeToUSB (http://GoCoding.Com)
-usb_prep8 (Prepares Windows XP Setup LocalSource for Copy to USB-Drive)

step 3:
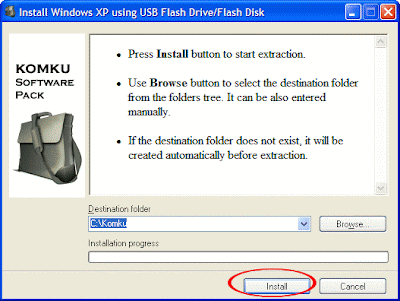
Double click Komku-SP-usb.exe


a window will appear... and click Install


step 4:
Insert your USB Flash Drive.
When I made this tutorial, I was using 4GB Transcend USB FlashDrive...


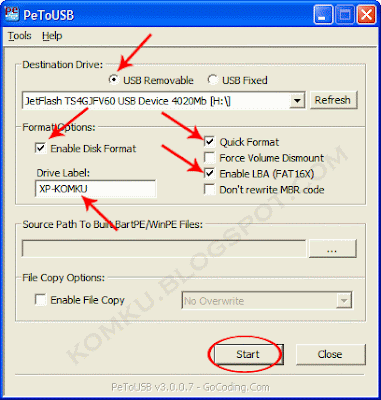
Locate folder C:\PeToUSB\
double click PeToUSB.exe


a window will appear like this...


Destination Drive : select USB Removable
check on Enable Disk Format
check on Quick Format
check on Enable LBA (FAT 16x)
Drive Label : XP(or whatever you want)
then click Start

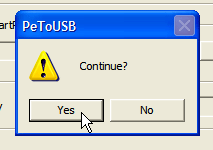
Click Yes to continue....


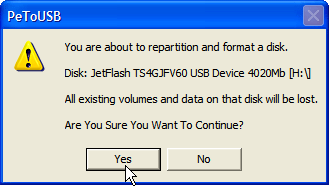
"You are about to repartition and format a disk. Disk: .... All existing volumes and data on that disk will be lost. Are You Sure You Want To Continue?"
click Yes


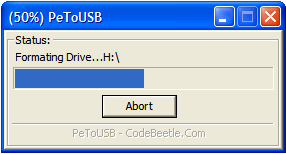
Wait a few seconds...

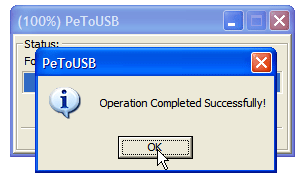
Click OK, and you can close PeToUSB window.


step 5:
Open Command Prompt ...
Click Start > Run > type cmd > click OK


On Command Prompt window, go to directory C:\bootsect\
how to do this?
first type this cd\ and press Enter


then type cd bootsect and press Enter


the result...


Don't close Command Prompt window, and go to step 6...


step 6:
on command prompt window, type bootsect /nt52 H:


H:
is drive letter for my USB Flash Drive, it may be different with yours...

and press Enter

the result... "Successfully updated filesystem bootcode. Bootcode was succesfully updated on all targeted volumes."


don't close Command Prompt window, and go to step 7...


step 7:
now type this cd.. and press Enter


then type cd usb_prep8 and press Enter


type usb_prep8 again... and pres Enter


step 8:
Your command prompt window will look like this


Press any key to continue...
usb_prep8 welcome screen will appear


Prepares Windows XP LocalSource for Copy to USB-Drive:

0) Change Type of USB-Drive, currently [USB-stick]
1) Change XP Setup Source Path, currently []
2) Change Virtual TempDrive, currently [T:]
3) Change Target USB-Drive Letter, currently []
4) Make New Tempimage with XP LocalSource and Copy to USB-Drive
5) Use Existing Tempimage with XP LocalSource and Copy to USB-Drive
F) Change Log File - Simple OR Extended, currently [Simple]
Q) Quit

Enter your choice:_

now, insert your original Windows XP CD, or Windows XP with sata ahci driver to your CD/DVD ROM
and back to Command Prompt window

type 1 then press Enter...
"Browse For Folder" window will appear, select your CD/DVD drive and click OK


the result... "XP Setup Source Path" changed to G:\ (yours may be different)


now for point 2, if letter T is currently assigned to a drive in your computer, you must change it.... if not, leave it as it is
how to change it?
type 2 and press Enter...
"Enter Available Virtual DriveLetter"
for example you doesn't have drive S
so you type S and press Enter

back to usb_prep8 welcome screen...
now type 3 and press Enter...

"Please give Target USB-Drive Letter e.g type U" Enter Target USB-Drive Letter:
because my Flash drive letter is H
so, type H and press Enter...

after back to usb_prep8 welcome screen...
now type 4 and press Enter to make new temporary image with XP LocalSource and copy it to USB Flash Drive
please wait a few seconds..


"WARNING, ALL DATA ON NON-REMOVABLE DISK
DRIVE T: WILL BE LOST! Proceed with Format (Y/N)?"
type Y and press Enter
please wait....
when format virtual disk complete, press any key to continue...


please wait... making of LocalSource folder is in progress...


when "Making of LocalSource folder $WIN_NT$.~LS Ready"
Press any key to continue...


"Copy TempDrive Files to USB-Drive in about 15 minutes = Yes OR STOP = End Program = No"
Click Yes, and wait...


"Would you like USB-stick to be preferred Boot Drive U: bla... bla..."
Click Yes


"Would you like to unmount the Virtual Drive ?"
Click Yes, wait a few seconds, and press any key....
press any key again to close usb_prep8...


Now, your USB Flash Drive is ready...


step 9:
Now, insert your USB Flash Drive/Flash Disk/Thumb Drive to your notebook (e.g Acer Aspire One)
go to BIOS and make USB HDD (or USB ZIP in some other machine) as primary boot device....

then boot form your USB Flash Drive....
and select "TXT Mode Setup Windows XP, Never unplug USB-Drive Until After Logon"


After Hard Disk detected, delete all partition, create single partition... and install Windows XP on that partition...
and wait...


once text mode setup is complete, computer will restart....
this time select "GUI Mode setup Windows XP, Continue Setup + Start XP"


Continue Windows XP setup.... and Done!
Windows XP Installed....


Remember, you can use this tutorial to install Windows XP on all other computers.

Comment please (click Here)